Advanced
Selecting Data
The view supports the concept of multiple selection, first introduced in our Hex Editor Neo product. That means that several non-contiguous ranges of data may be selected at the same time. We refer you to the documentation of the Hex Editor Neo for more information about the multiple selection concept and how to work with it.
You may use both mouse and keyboard to select data. Hold the Shift key while navigating to modify the current selection. Hold the left mouse button and drag the mouse to do the same. Hold the Ctrl or Alt keys to change mouse selection behavior.
To select the whole packet the cursor stays in, execute the Edit » Select Packet command.
You can select all data in a stream using the Edit » Select All command and drop the selection using the Edit » Select None command. You can invert the current selection using the Edit » Select Invert command.
Another way to select data is to execute the Find All command. See Searching for Data for more information.
Exporting Data
After you selected data in a view, you may copy it to the Clipboard or export to the file.
- Copying to the Clipboard
After you execute the Edit » Copy command, depending on whether the cursor is currently in Code Pane or Text Pane, the following occurs:
- If the Code Pane is active, numbers displayed in code pane are placed into the Clipboard. Settings like Display As, Group By and others affect the result.
- If the Text Pane is active, the textual representation of the selected data is placed into the Clipboard. Currently selected encoding for the view is used to convert text.
- Exporting data
- Executing the Edit » Export… command copies the selected binary data to the given file. Data is copied “as is”.
Searching for Data
Raw Data View visualizer provides you with rich text and data searching capabilities. To start searching, execute the Edit » Find… command.
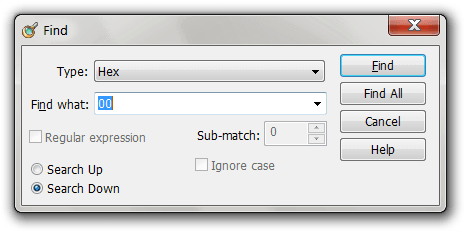
You may search for an encoded text string, UNICODE text string, regular expression or byte sequence. Select the type from the Type drop down box, enter the pattern to search in the Find what box, specify additional options and press either the Find or Find All buttons.
For both string options, you may enable regular expression mode. If regular expression mode is enabled, you may choose the sub-match to use. See the Regular Expressions topic for more information on supported syntax and options.
After you press the Find button, Device Monitoring Studio locates the first occurrence of a pattern. If pattern is not found, a message box is displayed. Use the Edit » Find Next command to continue searching.
Another option is to press the Find All button. In this mode, Device Monitoring Studio will search for all occurrences of a pattern and produce a multiple selection, containing all located ranges.
After you execute the Find All command, the Find All Results window is displayed:
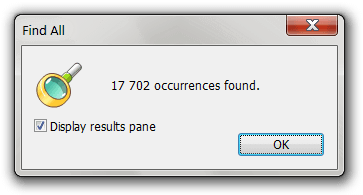
If you leave the Display results pane box checked, the Selection tool window is displayed. It displays brief information about a multiple selection object, as well as a list of all ranges in a selection object. Clicking on a range moves the cursor to the beginning of the range. Right clicking on it opens a shortcut menu with following commands:
- Go to Start
- Move the cursor to the beginning of the range.
- Go to End
- Move the cursor to the end of the range.
- Delete Block
- Removes the given range from a selection.
- Clear Selection
- Clears the selection.
Go to Offset
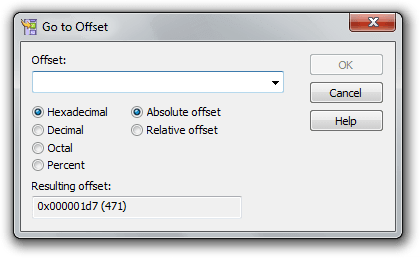
You can change the way entered offset is interpreted, according to the following table:
| Number Type | Absolute offset | Relative offset |
|---|---|---|
| Hexadecimal | Absolute offset in hexadecimal format. Only non-negative values are allowed. | Relative offset in hexadecimal format. May either be positive or negative number. The resulting offset is then calculated by adding the given offset to the current one. |
| Decimal | Absolute offset in decimal format. Only non-negative values are allowed. | Relative offset in decimal format. May either be positive or negative number. The resulting offset is then calculated by adding the given offset to the current one. |
| Octal | Absolute offset in octal format. Only non-negative values are allowed. | Relative offset in octal format. May either be positive or negative number. The resulting offset is then calculated by adding the given offset to the current one. |
| Percent | Absolute offset in decimal format as a percent of the current file's size. |
The resulting offset is displayed at the bottom of the window in hexadecimal and decimal formats.